Before you begin
- A compatible Linux host such as Debian or Red Hat.
- 2GB or more of RAM per machine(Any less will leave more little room for you apps).
- 2CPU or more.
- Full network connectivity between all machines in cluster(public or private netwrok is fine).
- Unique hostname, MAC Address and product_uuid for every node.
- Make sure certain ports are open on your machine. See here for more details.
- Traffic allowed through your firewall using the ports and protocols described in the documentation.
- Disabled swap memory on each node; otherwise, kubeadm will not work correctly. For example sudo swapoff -a will disable swapping temporarily.
- Make sure Docker is installed on all nodes. This how you must install Docker on all nodes.
Creating a sudo user
Setup sudo user properly for kubernetes master node by executing these commands. In this example user is called `deadshot`, but you can use any name that suits your needs.
sudo adduser deadshot# Add this new user to 'sudo' group with the command:sudo usermod -aG sudo deadshot# Switch to new user with this command:su - deadshot# Update the operating system with this command:sudo apt update && sudo apt upgrade -y
Disable swap memory
- To ensure the node does not use swap memory, run the following command.
- This command perform two operations. First, it disable swap memory, then it comments out the swap entry in `/etc/fstab`, which ensures that swap will remain disabled after each reboot.
sudo swapoff -a && sudo sed -i '/ swap / s/^(.*)$/#{{$1}}/g' /etc/fstab
Setting up unique hostname
As explained in the documentation, you need to make sure that each node in cluster has unique hostname,otherwise initionalization will fail. For this tutorial control-plane or master node will be called `master` and the worker nodes will be called `worker`.
In the control-plane or master node, use the following commands to change the hostname:
sudo hostnamectl set-hostname master
Now, edit and update the `/etc/host` to add the choosen hostname:
sudo nano /etc/hosts# Update the file and add the following line:127.0.0.1 master
Once the changes have been saved, restart the node
sudo reboot now
You must follow the same procedure explained for the `master` node in all `worker` nodes. That is to say, assigning a unique hostname (in this case, worker), disabling swap memory, and creating a sudo user. Once you have completed this, you can continue with the next steps, where you’ll install the operating-system-level packages required by Kubernetes on each node.
Installing Docker Engine
In order to work, Kubernetes requires you to install a container runtime. Available options include containerd, CRI-O, and Docker.
Start by installing the following packages on each node. Make sure to run the below command one by one:
# Install Docker Enginesudo apt install ca-certificates curl gnupg lsb-releasecurl -fsSL https://download.docker.com/linux/ubuntu/gpg | sudo gpg --dearmor -o /usr/share/keyrings/docker-archive-keyring.gpgecho "deb [arch=$(dpkg --print-architecture) signed-by=/usr/share/keyrings/docker-archive-keyring.gpg] https://download.docker.com/linux/ubuntu $(lsb_release -cs) stable" | sudo tee /etc/apt/sources.list.d/docker.list > /dev/nullsudo apt update && sudo apt install docker-ce docker-ce-cli containerd.io -ysudo systemctl start docker && sudo systemctl enable docker
Before proceding to next step, verify that Docker is working properly.
sudo systemctl status docker
The output should look similar to below image:

Configure Cgroup Driver
For the `kubelet` process to work correctly, it's cgroup diver needs to match the one used by Docker.
To do this, you can adjust the Docker configuration using following command on each node:
cat <<EOF | sudo tee /etc/docker/daemon.json{"exec-opts": ["native.cgroupdriver=systemd"],"log-driver": "json-file","log-opts": {"max-size": "100m"},"storage-driver": "overlay2"}EOF
Once you have setup these configurations. Restart docker daemon
sudo systemctl daemon-reload && sudo systemctl restart docker
With Docker up and running, the next step is to install `kubeadm`, `kubelet` and `kubectl` on each node.
Installing kubeadm, kubelet and kubectl
Start by installing these dependencies required by Kubernetes on each node:
sudo apt-get install -y apt-transport-https ca-certificates curl gpgsudo curl -fsSLo /usr/share/keyrings/kubernetes-archive-keyring.gpg https://packages.cloud.google.com/apt/doc/apt-key.gpgecho "deb [signed-by=/usr/share/keyrings/kubernetes-archive-keyring.gpg] https://apt.kubernetes.io/ kubernetes-xenial main" | sudo tee /etc/apt/sources.list.d/kubernetes.list
Update the `apt` package index. Install `kubeadm`, `kubelet` on all nodes and kubectl only on master node by running the dollowing command:
# Make sure to run these commands togethersudo apt update&& sudo apt install -y kubelet kubeadm kubectl&& sudo apt-mark hold kubelet kubeadm kubectl
The last line with the `apk-mark hold` is optional, but highly recommended. This will prevent all packages from being updated until you unhold them with this command.
# Note: This command is just for information.sudo apt-mark unhold kubelet kubeadm kubectl
Initializing the control-plane node
At this point, you have two nodes with kubeadm, kubelet, and kubectl installed. Now you initialize the Kubernetes control plane, which will manage the worker node and the pods running within the cluster.
Run the following command on the master node to initialize your Kubernetes cluster:
sudo kubeadm init --pod-network-cidr 192.168.0.0/16 --service-cidr 192.169.0.0/16 --node-name master
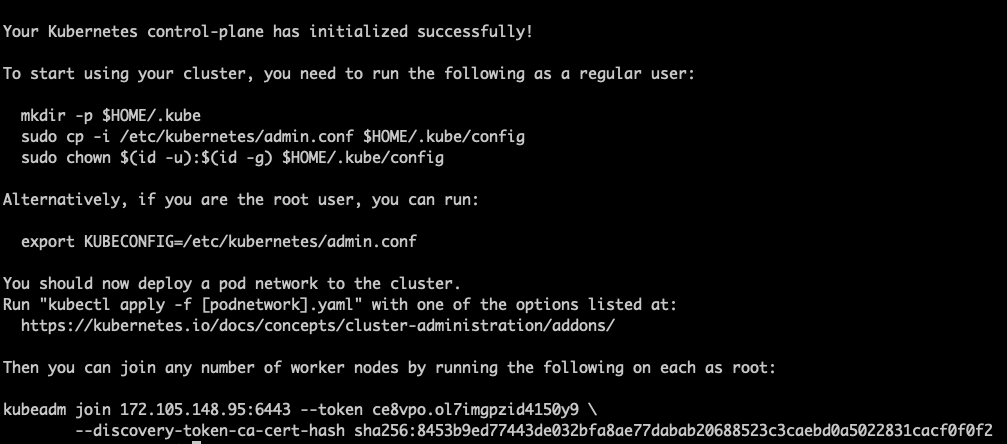
If you have followed the steps in the tutorial, you should see a message similar to the following:
Configuring kubectl
mkdir -p $HOME/.kube&& sudo cp -i /etc/kubernetes/admin.conf $HOME/.kube/config&& sudo chown $(id -u):$(id -g) $HOME/.kube/config
Installing calico cni
kubectl apply -f https://docs.projectcalico.org/manifests/calico.yaml
Check all nodes
kubectl get nodeskubectl get pods --all-namespaces